

Chapter 01 Patterns in Mathematics Solutions
November 5, 2024Chapter 03 Number Play Solutions
November 5, 2024Chapter 02 Lines and Angles Text Book Solutions
Page 15
Q1: Rihan marked a point on a piece of paper. How many lines can he draw that pass through the point?
Ans: Rihan can draw an infinite number of lines that pass through a single point.
Explanation: When you have just one point on a paper, you can draw as many lines as you want that pass through this point because there is no limit to how many directions a line can go from that point. Imagine a spinning top; as it spins, it covers every possible direction from that point.
Q2: Sheetal marked two points on a piece of paper. How many different lines can she draw that pass through both of the points?
Ans: Sheetal can draw exactly one line that passes through both points.
Explanation: When you have two distinct points on a paper, only one straight line can connect them directly. Think of it like a straight path between two places; there is only one shortest path that directly connects them without any curves.
Page 16
Q2: Name the line segments in Fig. 2.4. Which of the five marked points are on exactly one of the line segments? Which are on two of the line segments?
Ans:
The line segments are LM, MP, PQ, and QR.
The points on exactly one line segment are L and R. Explanation: Point L is only on segment LM, and point R is only on segment QR because they are at the ends of these segments and do not connect to any other segments.
The points on two line segments are M, P, and Q. Explanation: Point M connects LM and MP, point P connects MP and PQ, and point Q connects PQ and QR. These points are where two segments meet or overlap.
Q3: Name the rays shown in Fig. 2.5. Is T the starting point of each of these rays?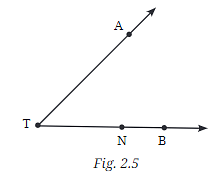
Ans:
The rays are TA and TN.
Yes, T is the starting point of both rays. Explanation: A ray starts at one point and goes off infinitely in one direction. In this case, both rays TA and TN start at point T and go towards A and N, respectively.
Q4: Draw a rough figure and write labels appropriately to illustrate each of the following:
- a. OP and OQ meet at O. Explanation: Draw two lines (rays) starting from point O, one going towards point P and the other towards point Q. They meet at O because it is their common starting point.
- b. XY and PQ intersect at point M. Explanation: Draw two lines that cross each other at point M. One line goes from X to Y, and the other goes from P to Q. The point where they cross is M.
- c. Line l contains points E and F but not point D. Explanation: Draw a straight line labeled l with two points, E and F, on it. Point D should be somewhere off this line.
- d. Point P lies on AB. Explanation: Draw a straight line segment AB with a point P located somewhere on the line between A and B.
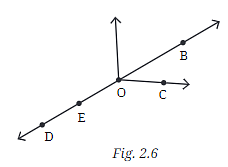
Q5: In Fig. 2.6, name:
- a. Five points
- b. A line
- c. Four rays
- d. Five line segments
Ans:
- a. Five points: The five points in the figure are D, E, O, C, and B. Explanation: Points are specific locations on the diagram, and they are labeled with letters.
- b. A line: The line in the figure is DC. Explanation: A line is straight and extends in both directions without ending. In the diagram, DC extends through points D and C.
- c. Four rays: The four rays in the figure are OD, OE, OC, and OB. Explanation: A ray starts at one point and extends infinitely in one direction. Here, all rays start at point O and go through the points D, E, C, and B respectively.
- d. Five line segments: The five line segments in the figure are DO, OE, OC, OB, and DB. Explanation: A line segment has two endpoints, so it is like a piece of a line that doesn’t go on forever. Each of these segments connects two of the points mentioned.
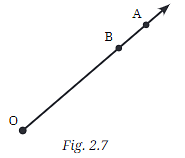
Q6: Here is a ray OA (Fig. 2.7). It starts at O and passes through the point A. It also passes through the point B.
- a. Can you also name it as OB? Why?
- b. Can we write OA as AO? Why or why not?
Ans:
a. Can you also name it as OB? Why? No, you cannot name the ray as OB.
Explanation: A ray is named starting from its endpoint and going through another point in its path. Since OA starts at O and passes through A, it must be named OA, even if it passes through other points like B later on. OB would imply that the ray starts at O and goes through B first.
b. Can we write OA as AO? Why or why not? No, we cannot write OA as AO.
Explanation: The order of letters in a ray’s name matters because the first letter (O) indicates where the ray begins. Writing it as AO would incorrectly suggest that A is the starting point.
Page 19
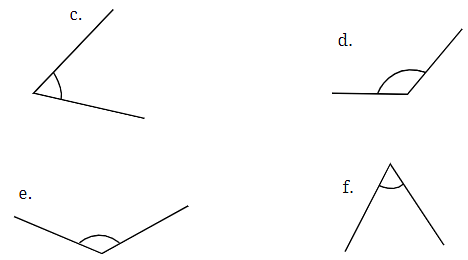
Q1: Can you find the angles in the given pictures? Draw the rays forming any one of the angles and name the vertex of the angle.
Ans: Students should try to solve this question on their own, but here’s a hint to help them along the way: Yes, the angles can be found in the pictures by identifying where two rays meet.
Explanation: For example, if you see two lines or edges meeting at a point, the point where they meet is the vertex of the angle. Draw two rays starting from this vertex along the lines or edges to form the angle.
Page 20
Q2: Draw and label an angle with arms ST and SR.
Ans: Students should try to solve this question on their own, but here’s a hint to help them along the way: To draw this angle:
First, draw a point S, which will be the vertex.
Next, draw a ray starting at S and going in one direction. Label the other end T (making the ray ST).
Then, draw another ray starting at S but going in a different direction. Label the other end R (making the ray SR).
This forms an angle ∠TSR with S as the vertex, ST and SR as the arms.
Explanation: The arms are the rays extending from the vertex, and the vertex is where these rays meet.
Q3: Explain why ∠APC cannot be labelled as ∠P.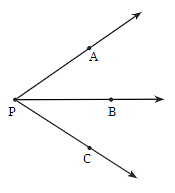
Ans: ∠APC cannot be labeled as ∠P because there is more than one angle at point P.
Explanation: If you only write ∠P, it’s unclear which angle you are talking about because there could be multiple angles that share the same vertex (P). By using all three points (A, P, C), you make it clear which angle is being discussed.
Q4: Name the angles marked in the given figure.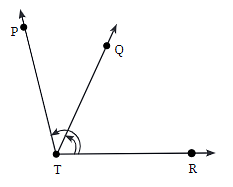
Ans: The angles marked in the figure are:
∠PTR
∠QTR
Explanation: To name an angle, you use three points: one on each arm and the vertex in the middle. The vertex is where the two rays or arms meet.
Q5: Mark any three points on your paper that are not on one line. Label them A, B, C. Draw all possible lines going through pairs of these points. How many lines do you get? Name them. How many angles can you name using A, B, C? Write them down, and mark each of them with a curve as in Fig. 2.9.
Ans: Students should try to solve this question on their own, but here’s a hint to help them along the way:
Draw three points A, B, and C on your paper.
Draw lines connecting each pair: AB, BC, and AC.
You get three lines: AB, BC, and AC.
Explanation: Each pair of points forms one line. Since there are three points, there are three lines.
The angles formed are ∠ABC, ∠BCA, and ∠CAB.
Explanation: With three points, three angles are formed at the intersections of these lines. The vertex of each angle is the point where the two rays meet.
Page 21
Q6: Now mark any four points on your paper so that no three of them are on one line. Label them A, B, C, D. Draw all possible lines going through pairs of these points. How many lines do you get? Name them. How many angles can you name using A, B, C, D? Write them all down, and mark each of them with a curve as in Fig. 2.9.
Ans: Students should try to solve this question on their own, but here’s a hint to help them along the way:
Draw four points A, B, C, and D on your paper.
Draw lines connecting each pair: AB, AC, AD, BC, BD, and CD.
You get six lines: AB, AC, AD, BC, BD, and CD.
Explanation: With four points, each pair of points forms one line, resulting in six lines.
The angles formed are ∠ABC, ∠ABD, ∠ACD, ∠BAC, ∠BAD, ∠CAD, ∠BCD, ∠BDC, and ∠ADC.
Explanation: With four points, several angles can be formed at the intersections of these lines. Each angle is named by three points, with the vertex in the middle.
Page 23
Q1: Fold a rectangular sheet of paper, then draw a line along the fold created. Name and compare the angles formed between the fold and the sides of the paper. Make different angles by folding a rectangular sheet of paper and compare the angles. Which is the largest and smallest angle you made?
Ans:
Fold the paper and draw a line along the fold.
Name the angles formed between the fold and the sides of the paper as ∠AOB and ∠BOC (where O is the point where the fold intersects the side of the paper).
Explanation: By folding the paper, you create an angle at the fold. The largest angle you can make by folding is a straight angle (180°) when the fold lies flat along one side of the paper. The smallest angle is when the fold barely moves away from the side, creating a very acute angle.
Q2: In each case, determine which angle is greater and why.
- a. ∠AOB or ∠XOY
- b. ∠AOB or ∠XOB
- c. ∠XOB or ∠XOC
Ans:
- a. ∠XOY is greater than ∠AOB Explanation: When comparing two angles, the one that opens wider is larger.
- b. ∠AOB is greater than ∠XOB Explanation: ∠AOB covers more space between its arms than ∠XOB.
- c. ∠XOB is greater than ∠XOC Explanation: You can see which angle is larger by checking which one has arms that are further apart.
Explanation: You can compare angles visually by imagining or drawing them side by side or by using a protractor to measure them directly.
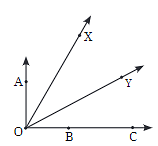
Q3: Which angle is greater: ∠XOY or ∠AOB? Give reasons.
Ans: ∠XOY is greater than ∠AOB.
Explanation: To compare the two angles, observe their positions relative to the point O:
∠XOY is formed by the rays OX and OY. This angle appears wider or more open compared to ∠AOB.
∠AOB is formed by the rays OA and OB. This angle is narrower or less open compared to ∠XOY.
Since ∠XOY covers more space (or has a larger opening) than ∠AOB, we can conclude that ∠XOY is greater. In geometrical terms, when you compare two angles at a common vertex, the one that spans a wider area is considered the larger angle.
Page 29
Q1: How many right angles do the windows of your classroom contain? Do you see other right angles in your classroom?
Ans: Students should try to solve this question on their own, but here’s a hint to help them along the way: The number of right angles in the windows depends on how they are constructed. Typically, each corner of a rectangular window forms a right angle.
Explanation: A right angle is 90°, and it is found in the corners of rectangles and squares. So, if each window has four corners, it has four right angles. Other right angles can be found in corners of tables, books, doors, etc.
Q1: Join A to other grid points in the figure by a straight line to get a straight angle. What are all the different ways of doing it?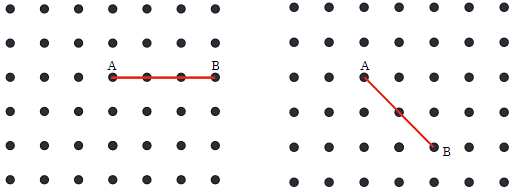
Ans: Students should try to solve this question on their own, but here’s a hint to help them along the way:
Draw lines from point A to the points that lie directly opposite each other. These lines should lie along the same straight path.
Explanation: A straight angle is 180°, which is the angle formed by a straight line. If you connect A to points directly in line with each other, you form a straight angle.
Q3: Now join A to other grid points in the figure by a straight line to get a right angle. What are all the different ways of doing it?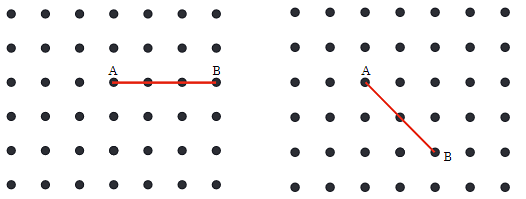
Ans: To create a right angle at point A, you need to draw a line through A that makes a 90-degree turn from line AB. Here are the different ways to do it:
- Horizontal and Vertical Lines: You can draw a line from A straight up or down vertically and another line from A horizontally to the right or left. This will create a right angle at A.
- Diagonal Lines: You can also draw a line from A to the points diagonally opposite, such as moving upward to the left or downward to the right, as long as the line forms a right angle (90 degrees) with AB.
Explanation: A right angle is formed when two lines meet and create a 90-degree angle. In the grid, you can use the dots to guide your lines to ensure they are straight and meet at right angles.
Q4: Get a slanting crease on the paper. Now, try to get another crease that is perpendicular to the slanting crease.
- a. How many right angles do you have now? Justify why the angles are exact right angles.
- b. Describe how you folded the paper so that any other person who doesn’t know the process can simply follow your description to get the right angle.
Ans:
- a. You will have four right angles now.
- Explanation: When you fold the paper to create a crease that is perpendicular to the first, the two creases intersect at a right angle, dividing the plane into four right angles of 90 degrees each.
- b. To create a right angle:
- First Fold: Start by folding the paper so that one corner meets the opposite edge, creating a slanting crease.
- Second Fold: Now, fold the paper again, but this time align the slanting crease with the edge of the paper, ensuring the fold is perpendicular to the first crease.
- Unfold: When you open the paper, you will see that the two creases intersect at a 90-degree angle, forming four right angles.
- First Fold: Start by folding the paper so that one corner meets the opposite edge, creating a slanting crease.
Explanation: The second fold must be made carefully, aligning the first crease with the edge of the paper to ensure the two creases are perpendicular. This guarantees that the angles formed are exactly 90 degrees.
Page 31
Q1: Identify acute, right, obtuse, and straight angles in the previous figures.
Ans: Students should try to solve this question on their own, but here’s a hint to help them along the way:
- Acute angles are less than 90°, such as angles that are sharp and narrow.
- Right angles are exactly 90°, like the corners of a square.
- Obtuse angles are between 90° and 180°, like angles that are wider but not completely flat.
- Straight angles are 180°, like a line that doesn’t bend.
Explanation: To identify these angles, look at how much the angle opens. An acute angle is small, a right angle forms an “L” shape, an obtuse angle is larger, and a straight angle is flat.
Q2: Make a few acute angles and a few obtuse angles. Draw them in different orientations.
Ans: Students should try to solve this question on their own, but here’s a hint to help them along the way:
Draw angles that are less than 90° (acute) and angles greater than 90° but less than 180° (obtuse). Acute angles are sharper, and obtuse angles are wider. You can change their orientation by rotating them, but the angle measure remains the same.
Q3: Do you know what the words acute and obtuse mean? Acute means sharp and obtuse means blunt. Why do you think these words have been chosen?
Ans: The words “acute” and “obtuse” are used to describe angles because they reflect the visual characteristics of the angles:
- Acute angles are called “sharp” because they are less than 90 degrees and appear pointed, similar to the sharp edge of a knife.
- Obtuse angles are called “blunt” because they are greater than 90 degrees and appear wider, similar to the blunt end of an object.
Explanation: These terms help to visualize the nature of the angles, where an acute angle looks more pointed, and an obtuse angle looks wider and less pointed.
Q4: Find out the number of acute angles in each of the figures below.
Ans:
- First figure: There are 3 acute angles in the first triangle.
- Second figure: There are 12 acute angles in the second figure (each of the 4 smaller triangles has 3 acute angles).
- Third figure: There are 27 acute angles in the third figure (each of the 9 smaller triangles has 3 acute angles).
Explanation: As the figures increase in complexity, the number of acute angles increases in a pattern. The next figure would likely have more smaller triangles, and therefore more acute angles. The pattern shows that the number of acute angles triples with each step.
Page 40
Q1: Find the degree measures of the following angles using your protractor.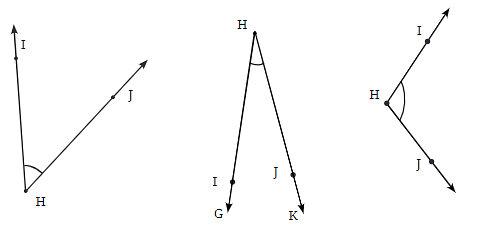
Ans: Students should try to solve this question on their own, but here’s a hint to help them along the way: Use a protractor to measure each angle in the diagram provided. Place the protractor’s center at the vertex of the angle and align one arm with the 0° mark. Read the number where the other arm crosses the scale to get the measure in degrees.
Q2: Find the degree measures for the angles given below. Check if your paper protractor can be used here!
Ans: Students should try to solve this question on their own, but here’s a hint to help them along the way: Measure each angle using your protractor. If your paper protractor was made correctly, it should give you the same results as a standard protractor.
Q3: Find the degree measures for the angles given below. Check if your paper protractor can be used here!
Ans: 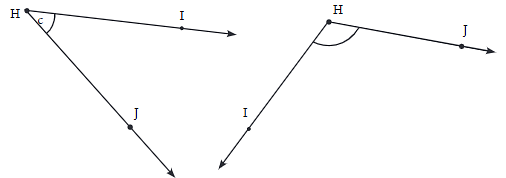
- First Angle (∠HIJ): To find the degree measure of ∠HIJ, place the center of the protractor at point I (the vertex of the angle). Align one of the rays (IH) with the baseline of the protractor (0° mark). Then, read the number on the protractor where the other ray (IJ) crosses the scale. The angle might measure around 45° depending on the image scale.
- Second Angle (∠HIJ): For the second angle ∠HIJ, place the center of the protractor at point I and align one ray (IH) with the baseline of the protractor. Then, measure the angle where the ray (IJ) crosses the protractor’s scale. This angle might measure around 130° depending on the image scale.
Explanation: To accurately measure these angles, ensure your paper protractor is precise and that it can measure the angles in question. The larger angle will be obtuse, and the smaller one will be acute.
Q4: How can you find the degree measure of the angle given below using a protractor?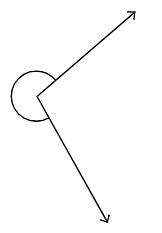
Ans: To measure the given angle:
- Place the Protractor: Position the center point of the protractor at the vertex of the angle.
- Align the Baseline: Align one of the angle’s rays with the 0° mark on the protractor’s baseline.
- Measure the Angle: Look at where the other ray crosses the protractor’s scale and read the degree measure.
Explanation: The angle you are measuring appears to be an obtuse angle (greater than 90°). By following these steps, you can accurately determine the angle’s degree.
Q5: Measure and write the degree measures for each of the following angles:
Ans: Students should try to solve this question on their own, but here’s a hint to help them along the way: Use a protractor to measure each angle in the diagrams provided. Just as before, place the protractor’s center on the vertex of the angle, align one arm with 0°, and read the measure on the scale where the other arm crosses.
Q6: Find the degree measures of ∠BXE, ∠CXE, ∠AXB, and ∠BXC.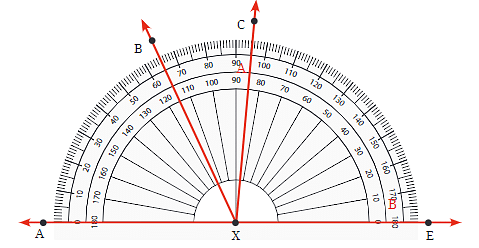
Ans: Students should try to solve this question on their own, but here’s a hint to help them along the way: Use a protractor to measure these angles and record the values. Explanation: Measure each angle by placing the protractor at the vertex X and reading the angles formed by the rays.
Q7: Find the degree measures of ∠PQR, ∠PQS, and ∠PQT.
Ans: 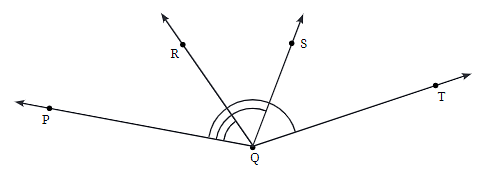
- ∠PQR: To measure ∠PQR, place the protractor at point Q, align it with the ray PQ, and measure the angle formed between ray PQ and ray QR. Suppose it measures around 45° (as an example based on typical angle diagrams).
- ∠PQS: To measure ∠PQS, place the protractor at point Q, align it with ray PQ, and measure the angle between ray PQ and ray QS. This angle is likely larger than ∠PQR and might measure around 70°.
- ∠PQT: To measure ∠PQT, place the protractor at point Q, align it with ray PQ, and measure the angle between ray PQ and ray QT. This angle is the sum of ∠PQR and ∠PQS and might measure around 115° (based on the sum of the example values).
Explanation: Each angle is measured by placing the protractor’s center at the vertex Q and aligning one of the rays with the 0° mark on the protractor. The other ray’s intersection with the protractor scale gives the degree measure. The sum of ∠PQR and ∠PQS should give you ∠PQT, as angles on a straight line add up.
Q8: Make the paper craft as per the given instructions. Then, unfold and open the paper fully. Draw lines on the creases made and measure the angles formed.
Ans: Students should try to solve this question on their own, but here’s a hint to help them along the way:
Follow the steps in the images to fold the paper into the shape shown.
After completing the folding steps, carefully unfold the paper to reveal the creases.
Draw lines along the creases with a pencil.
Use a protractor to measure the angles formed at the intersections of the creases.
Q9: Measure all three angles of the triangle shown in Fig. 2.21 (a), and write the measures down near the respective angles. Now add up the three measures. What do you get? Do the same for the triangles in Fig. 2.21 (b) and (c). Try it for other triangles as well, and then make a conjecture for what happens in general!
Ans: Students should try to solve this question on their own, but here’s a hint to help them along the way:
- For triangle (a): Measure angles ∠A, ∠B, and ∠C using a protractor. Suppose they are 60°, 60°, and 60°. When you add them up, you get 180°.
- For triangle (b): Measure angles ∠A, ∠B, and ∠C. Suppose they are 50°, 70°, and 60°. When you add them up, you get 180°.
- For triangle (c): Measure angles ∠A, ∠B, and ∠C. Suppose they are 30°, 90°, and 60°. When you add them up, you get 180°.
Explanation: In general, the sum of the angles in any triangle will always be 180°. This is a fundamental property of triangles, which you can observe in any triangle, no matter the shape or size.
Page 45
Q1: Angles in a clock:
- a. The hands of a clock make different angles at different times. At 1 o’clock, the angle between the hands is 30°. Why?
- b. What will be the angle at 2 o’clock? And at 4 o’clock? 6 o’clock?
- c. Explore other angles made by the hands of a clock
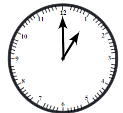
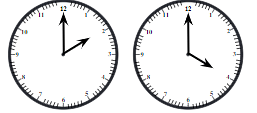
Ans:
- a. The clock is divided into 12 hours, so each hour mark is 30° apart (360° ÷ 12 = 30°). Explanation: At 1 o’clock, the hour hand is at 1, and the minute hand is at 12, forming a 30° angle.
- b. At 2 o’clock, the angle is 60° (30° × 2), at 4 o’clock it is 120° (30° × 4), and at 6 o’clock it is 180° (30° × 6). Explanation: The angle increases by 30° for each hour.
- c. Other angles include 90° at 3 o’clock, 150° at 5 o’clock, and so on. Explanation: By multiplying the hour by 30°, you can find the angle at any hour.
Page 51
Q1: In each of the below grids, join A to other grid points in the figure by a straight line to get:
- a. An acute angle
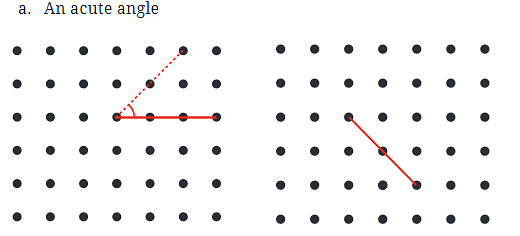
- b. An obtuse angle
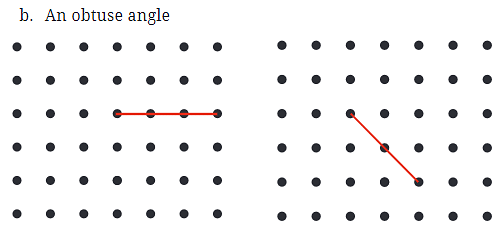
- c. A reflex angle

Ans:
- a. An acute angle: An acute angle is less than 90 degrees. In the left grid, the acute angle is formed by the lines connected to the points near A, creating a small angle. In the right grid, similarly, connect A to points closer to each other to form a small angle.
- b. An obtuse angle: An obtuse angle is more than 90 degrees but less than 180 degrees. In the left grid, the obtuse angle is formed by the lines connected to points further apart, creating a wider angle. In the right grid, connect A to more distant points to form a wider angle.
- c. A reflex angle: A reflex angle is greater than 180 degrees. In the left grid, the reflex angle is formed by lines connected to points on opposite sides of A, creating a very large angle. In the right grid, you can create a reflex angle similarly by connecting A to two points on nearly opposite sides.
Explanation: Mark the intended angles with curves to specify the exact angle as shown in the examples. Acute angles are sharp, obtuse angles are wider, and reflex angles extend beyond a straight line.
Q2: Use a protractor to find the measure of each angle. Then classify each angle as acute, obtuse, right, or reflex.
- a. ∠PTR
- b. ∠PTQ
- c. ∠PTW
- d. ∠WTP
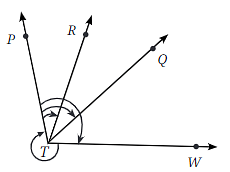
Ans:
- a. ∠PTR: Use a protractor to measure ∠PTR. Suppose it measures around 45°. This is an acute angle because it is less than 90°.
- b. ∠PTQ: Measure ∠PTQ with a protractor. Suppose it measures around 120°. This is an obtuse angle because it is more than 90° but less than 180°.
- c. ∠PTW: Measure ∠PTW using a protractor. Suppose it measures around 90°. This is a right angle because it is exactly 90°.
- d. ∠WTP: Measure ∠WTP with a protractor. Suppose it measures around 210°. This is a reflex angle because it is more than 180°.
Page 53
Q1: Draw angles with the following degree measures:
- a. 140°
- b. 82°
- c. 195°
- d. 70°
- e. 35°
Ans: Use a protractor to draw each angle with the specified measures. Explanation: To draw each angle, first draw a base line, place the protractor on one end, mark the desired degree, and then draw the second line to complete the angle.
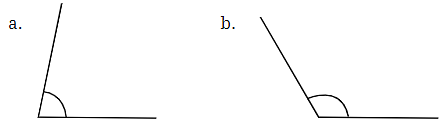
Q2: Estimate the size of each angle and then measure it with a protractor: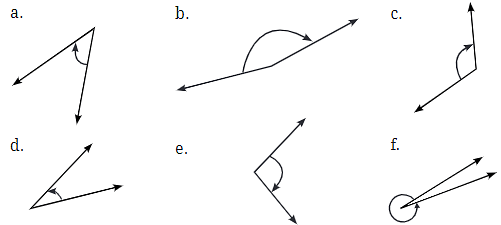
Ans: First, guess the size of each angle, then use a protractor to measure and compare your estimates. Explanation: Estimating angles helps develop an intuitive understanding of angle sizes. After estimating, use the protractor to find the exact measure.
Q3: Make any figure with three acute angles, one right angle, and two obtuse angles.
Ans: Draw a figure like a hexagon and adjust the angles to fit the description. Explanation: Ensure that three of the angles are less than 90° (acute), one is exactly 90° (right), and two are greater than 90° but less than 180° (obtuse).
Q4: Draw the letter ‘M’ such that the angles on the sides are 40° each and the angle in the middle is 60°.
Ans: Carefully draw the letter ‘M’ and use a protractor to measure and adjust the angles accordingly. Explanation: Each side of the ‘M’ should form a 40° angle with the base, and the central angle at the top should be 60°.
Q5: Draw the letter ‘Y’ such that the three angles formed are 150°, 60°, and 150°.
Ans: Draw the letter ‘Y’ and measure each angle to ensure they are 150°, 60°, and 150°. Explanation: The angles at the top should be wide (150°) while the central angle at the base should be narrower (60°).
Q6: The Ashoka Chakra has 24 spokes. What is the degree measure of the angle between two spokes next to each other? What is the largest acute angle formed between two spokes?
Ans:
The angle between two spokes is 15° (360° ÷ 24). Explanation: The Ashoka Chakra is a circle, and dividing 360° by the number of spokes (24) gives the angle between each pair of adjacent spokes.
The largest acute angle formed between two spokes would be between adjacent spokes, which is 15°.
Explanation: Acute angles are less than 90°, and since the angle between each spoke is 15°, it is the largest acute angle.
Q7: Puzzle: I am an acute angle. If you double my measure, you get an acute angle. If you triple my measure, you will get an acute angle again. If you quadruple (four times) my measure, you will get an acute angle yet again! But if you multiply my measure by 5, you will get an obtuse angle. What are the possibilities for my measure?

Ans: The possibilities for your measure are 10°, 15°, and 18°.
Explanation: An acute angle is less than 90°, so doubling, tripling, or quadrupling these values still results in an acute angle. However, multiplying by 5 gives 50°, 75°, and 90°, which makes 90° an obtuse angle in some cases.